The Eat N Park Smiley Cookies Recipe is more than just a baking project. It is a ticket to spreading happiness, one sugary smile at a time. If you have ever visited an Eat N Park restaurant in Pittsburgh, you know these iconic smiley face cookies are a nostalgic treat, loved by kids and adults alike.
I recently tackled this recipe in my kitchen, and let me tell you, the process was as delightful as the result. Baking these smiley faces was more than just following a recipe; it was an experience that brought out my inner child.
I love how these cookies combine simple ingredients into a cheerful masterpiece, perfect for sharing with family or brightening up any occasion. Whether you are a seasoned baker or a beginner eager to try something playful, this recipe is a fantastic way to bring a little joy to your kitchen.
What Does It Taste Like?
Biting into an Eat n Park Smiley Cookie is like sinking into a cloud of buttery sweetness. The cookie itself is soft and slightly crumbly, with a rich vanilla and almond flavor that is comforting and familiar. It is not overly sweet, which lets the icing take center stage without overwhelming your taste buds.
The icing is where the magic happens. It is smooth and glossy, with a delicate sweetness that melts on your tongue. The base layer adds a creamy texture, while the darker smiley face details give a slight crunch once set. Together, they create a perfect balance of soft cookies and firm icing that’s pure bliss.
Eating these cookies is an experience in joy. Each bite feels like a hug from childhood memories, evoking smiles, and laughter. Whether you are savoring them with a glass of milk or sharing them at a gathering, these cookies deliver a burst of happiness that is hard to beat.
Ingredients for Eat N Park Smiley Cookies Recipe
For the Cookie Base:
- 1 cup (2 sticks) unsalted butter, room temperature
- ¾ cup granulated sugar
- 2 large eggs
- 1 teaspoon vanilla extract
- ½ teaspoon almond extract
- 2¾ cups all-purpose flour
- 1 teaspoon of baking powder
- ½ teaspoon salt
For the Base Icing:
- 3 cups powdered sugar.
- 3-4 tablespoons milk
- 1 teaspoon vanilla extract
- Yellow food coloring
- Pinch of salt
For the Smiley Face Details:
- 1 cup powdered sugar
- 2-3 tablespoons milk
- cocoa powder (or color of your choice)
Kitchen Utensils
- Large mixing bowl
- Electric mixer (stand or hand mixer)
- Medium mixing bowl
- Wire whisk
- Measuring cups and spoons
- Plastic wrap
- Rolling pin
- Round cookie cutter (3-4 inches diameter)
- Parchment paper
- Baking sheets
- Wire cooling racks
- Small bowls for icing
- Fine tip piping bags or squeezing bottles.
- Toothpicks for detailed work
Prep Time: 45 minutes (plus 1 hour chilling time)
Baking Time: 10 minutes per batch
Decorating Time: 30 minutes
Recipe Instructions for Eat N Park Smiley Cookies
Make the Cookie Dough
In a large mixing bowl, cream together the butter and sugar on medium speed until light and fluffy for about 2 to 3 minutes. Add the eggs one at a time, mixing well after each. Stir in the vanilla and almond extracts. The almond adds that classic Eat n Park hint: do not skip it!
Combine the Dry Ingredients
In a separate bowl, whisk together the flour, baking powder, and salt. Gradually add the dry mixture to the wet ingredients, mixing until a soft but manageable dough forms. Divide the dough in half, flatten each portion into a disk, and wrap tightly in plastic wrap. Chill in the fridge for at least 1 hour.
Roll and Cut
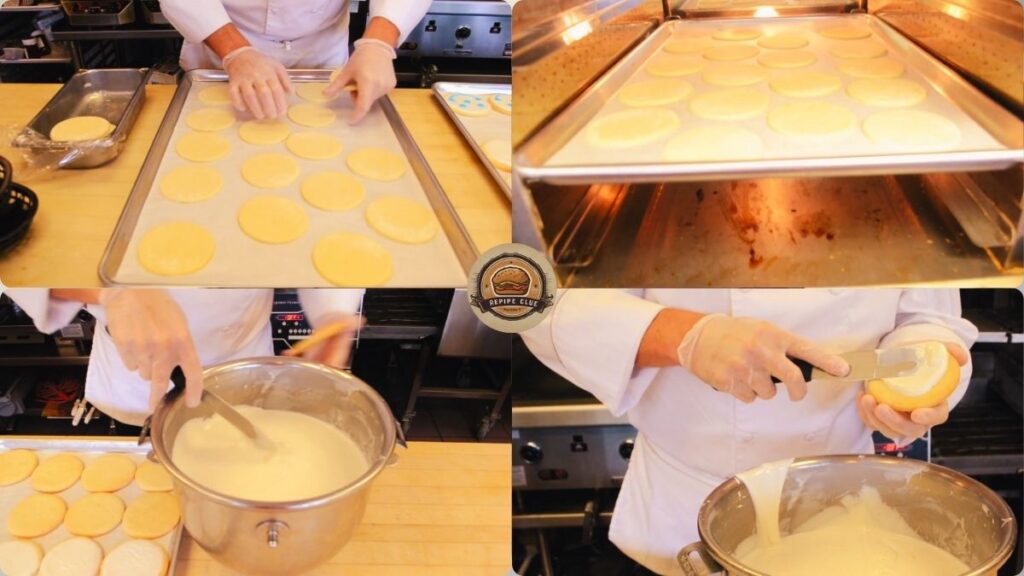
Preheat your oven to 350°F (175°C). Lightly flour your work surface and roll pin. Roll out one dough disk at a time to about ¼-inch thickness. Cut into circles or smiley shapes if you have a custom cutter, then place cookies 2 inches apart on a parchment-lined baking sheet.
Bake the Cookies
Bake in the preheated oven for 10 minutes or until the edges are just barely golden. Do not overbake. The goal is soft and tender, not crisp. Let them cool on the baking sheet for 5 minutes before transferring them to a wire rack.
Ice the Base
In a small bowl, whisk the powdered sugar, milk, and vanilla until smooth and slightly runny. Tint with food coloring of your choice. Pipe or spoon the icing onto each cooled cookie, spreading gently to the edges. Let them dry completely, 1-2 hours depending on humidity.

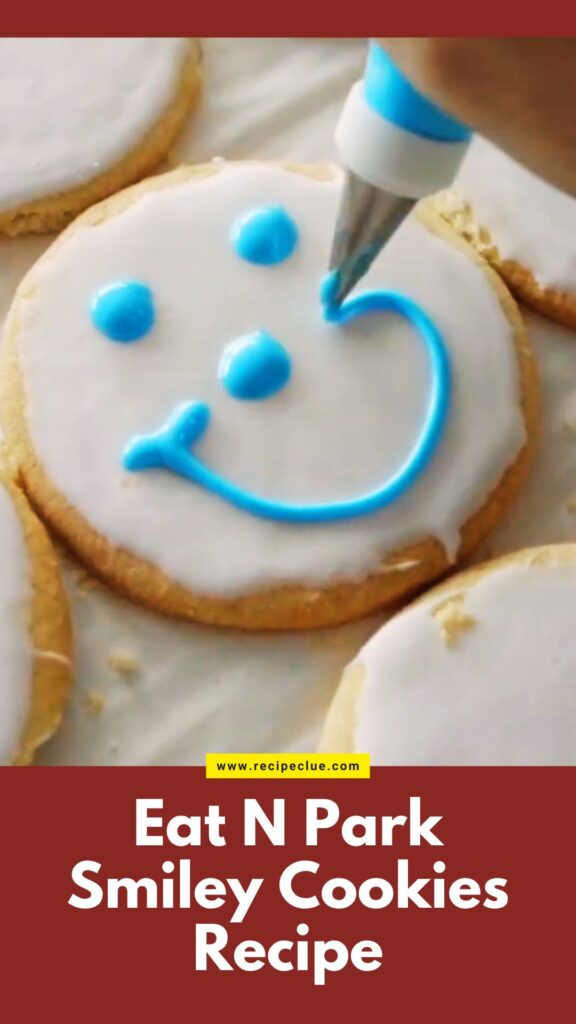
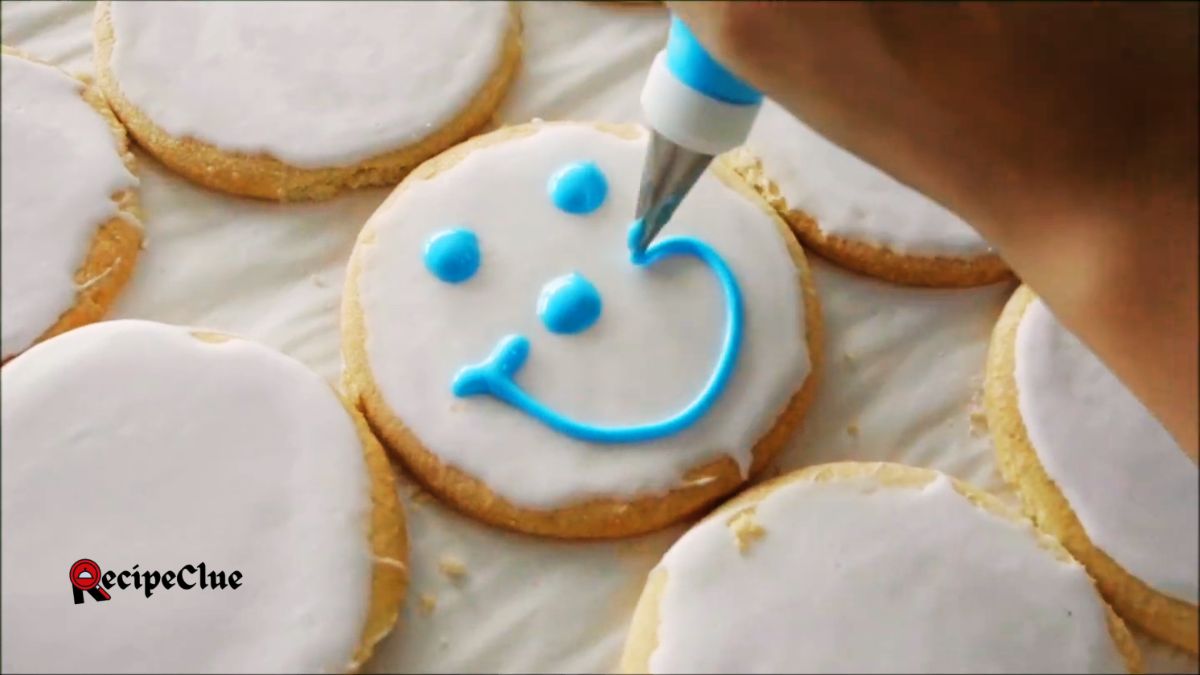
Draw the Smile
In another bowl, mix the smiley icing ingredients. Use a small piping tip or toothpick to draw eyes and a curved smile. Let sit uncovered until fully set, about 1-2 more hours. Your cookies should be dry to the touch before storing.
Food Pairings That Complement Smiley Cookies
1. Fresh Fruit Salad
Brighten your snack plate with a colorful mix of berries, melons, and citrus. The natural sweetness complements the cookies’ sugary icing.
2. Vanilla Yogurt
Serve a bowl of smooth, creamy yogurt topped with honey and fresh fruit alongside the cookies for a light, refreshing combo.
3. Lemonade
A chilled glass of lemon or citrus-infused water enhances the cheerful vibe and cuts through the richness.
4. Fruit Smoothie
Blend berries, banana, and a splash of juice for a vibrant, nutritious beverage that pairs well with the cookies’ playful nature.
5. Vegetable Crudités
Crunchy carrots, celery, and cucumber with hummus offer a savory contrast to the sweet cookies.
6. Almond Milk
A glass of almond or plant-based milk is a gentle, dairy-free option that complements the cookie’s buttery flavor.
7. Sweet Cornbread
Warm, slightly sweet cornbread provides a hearty side that balances the cookie’s delicate sweetness.
8. Berry Coulis
A drizzle of berry sauce adds a tart, fruity dimension, perfect for dipping or drizzling.
9. Whipped Cream
Create an elegant dessert by serving cookies with freshly whipped cream and a sprinkle of cinnamon. The light, airy cream enhances the cookie’s richness without overwhelming its delicate flavors.
10. Coconut Water
Hydrating and subtly sweet, coconut water refreshes your palate after indulging in the rich, sugary cookies.
Expert Tips for Perfect Smiley Cookies
- Use Softened Butter: Ensure your butter is at room temperature for easier creaming and a tender cookie.
- Chill the Dough: Do not skip the refrigeration step; it helps prevent spreading and keeps your cookies nice and round.
- Roll on a Floured Surface: Lightly dust your work surface to prevent sticking and achieve smooth, even cookies.
- Do not Overbake: Keep a close eye at 10 minutes, edges should be just golden for the perfect texture.
- Color Your Icing in Advance: Prepare your icing colors ahead of time to avoid rushing during decorating.
- Use Fine Tips for Details: A steady hand and a fine piping tip make drawing faces much easier.
- Set Icing Properly: Allow each layer to dry fully before adding the next to prevent smudging.
- Store Properly: Keep cookies in airtight containers to retain freshness and prevent icing from cracking.
- Experiment with Flavors: Add a pinch of cinnamon or lemon zest to the dough for a unique twist.
- Have Fun with Decorations: Use food grade colors and facial expressions to make each cookie uniquely cheerful.
Storage & Reheating Tips
Store your smiley cookies in a single layer inside an airtight container at room temperature for up to 5 days. If stacking is necessary, separate layers with parchment paper to protect the icing. To refresh the texture, you can microwave a cookie for 5-7 seconds. It will not re-crisp the edges, but it brings a delightful warmth that softens the cookie without melting the icing.
If your cookies smell sour, feel tacky, or develop mold, it is time to toss them. Sugar cookies should stay soft but never mushy or overly sticky. When in doubt, throw it out.
Eat N Park Smiley Cookies Recipe
Ingredients
Method
- In a large mixing bowl, cream together the butter and sugar on medium speed until light and fluffy for about 2 to 3 minutes. Add the eggs one at a time, mixing well after each. Stir in the vanilla and almond extracts. The almond adds that classic Eat n Park hint: do not skip it!
- In a separate bowl, whisk together the flour, baking powder, and salt. Gradually add the dry mixture to the wet ingredients, mixing until a soft but manageable dough forms. Divide the dough in half, flatten each portion into a disk, and wrap tightly in plastic wrap. Chill in the fridge for at least 1 hour.
- Preheat your oven to 350°F (175°C). Lightly flour your work surface and roll pin. Roll out one dough disk at a time to about ¼-inch thickness. Cut into circles or smiley shapes if you have a custom cutter, then place cookies 2 inches apart on a parchment-lined baking sheet.
- Bake in the preheated oven for 10 minutes or until the edges are just barely golden. Do not overbake. The goal is soft and tender, not crisp. Let them cool on the baking sheet for 5 minutes before transferring them to a wire rack.
- In a small bowl, whisk the powdered sugar, milk, and vanilla until smooth and slightly runny. Tint with food coloring of your choice. Pipe or spoon the icing onto each cooled cookie, spreading gently to the edges. Let them dry completely, 1-2 hours depending on humidity.
- In another bowl, mix the smiley icing ingredients. Use a small piping tip or toothpick to draw eyes and a curved smile. Let sit uncovered until fully set, about 1-2 more hours. Your cookies should be dry to the touch before storing.
Video
Notes
Frequently Asked Questions about the Eat N Park Smiley Cookies Recipe
I have covered all the questions that people ask about the Eat N Park Smiley Cookies recipe.
1. Can I freeze the dough?
Absolutely! Wrap the dough tightly and freeze for up to 3 months. Thaw before rolling out.
2. What is the best way to get perfect smiley faces?
Use a fine piping tip and steady hand. Practice on parchment first if needed.
3. Can I use store-bought icing?
Yes, but homemade icing gives you better control over flavor and consistency.
4. Will the icing bleed?
If the icing is not fully dry, the colors can bleed. Ensure each layer dries completely.
5. Are these cookies suitable for kids?
Definitely! They are fun to decorate and make a great craft activity for children.
6. How do I prevent the cookies from spreading?
Chill the dough well before baking and avoid overmixing.
7. Can I make the cookies vegan?
Substitute butter with vegan margarine and eggs with flaxseed or chia seed substitutes.
8. What is the best way to clean piping tips?
Wash with warm, soapy water immediately after decorating to prevent icing from drying and clogging the tips.
9. Can I use self-rising flour?
No, it is best to stick to all-purpose flour as specified. Self-rising flour contains leavening agents that might alter the cookie’s texture and spread beyond what is intended for this recipe.
10. Can I make them dairy-free?
Using plant-based butter and non-dairy milk in the icing works beautifully.
Recreating the Eat N Park Smiley Cookies Recipe was pure joy from start to finish. It is more than just baking; it is a chance to spread cheer, bite by bite. These cookies brought a huge grin to my face and in my kitchen, and I know they will do the same for you.
If you try this recipe, I would love to hear how your batch turned out. Drop me a comment, and do not forget to follow me on Pinterest, Reddit and YouTube more heartwarming recipes and kitchen tips that make baking joyful and accessible.
Happy baking and keep smiling!
1 thought on “Eat N Park Smiley Cookies Recipe”